|
Review
The SEALUX CD200 underwater housing for the Nikon D200 camera
By Colin Gans, April 2006
Published in UWPMag.com and Wetpixel.com, 2006
[Click here for Sealux CD300 Review] [Click here for Sealux CD70 Review]
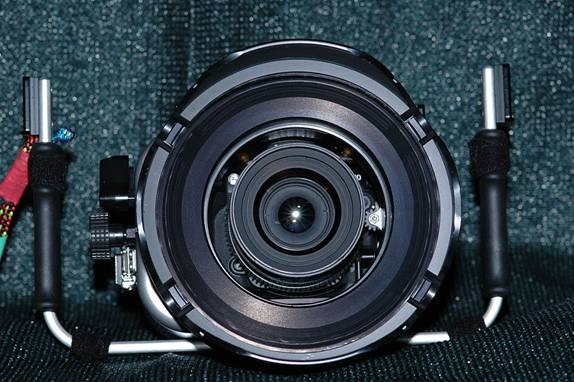
Sealux CD200 housing for Nikon D200 DSLR, 180F dome port, 12-24mm Nikkor DX lens
Disclaimer
All opinions expressed herein are those of the writer. No association exists between the writer and vendors mentioned in this review apart from that of paying consumer. Any measurements quoted should be taken as estimates only and they should be used for indicative purposes only. Feed back on any erroneous information discovered would be appreciated.
POV
This review is written from the perspective of:
· a current Nikon DSLR owner with an investment in compatible glass;
· a current Sealux underwater housing owner with an investment in compatible ports, strobes and cables;
· someone with an upside down view of the world who sees the sunrise earlier than most (I live in New Zealand).
The camera
The Nikon D200 offers a professional quality digital SLR camera in a smaller package than the flagship Nikon D2X. I have compared its capabilities to its stable mates, the larger and costlier Nikon D2X as a ‘role model’; and the lighter and slightly smaller Nikon D70 from whence I came. While a review of the camera itself is beyond the scope of this article, it is worthwhile noting that from an underwater perspective the main differences between the D200 and the D2X are the smaller physical size of the D200 and the D200’s lower price.
Where I live there is a saying, ‘If you don’t like the weather, wait half an hour’. In the world of digital cameras there could be a similar saying, ‘If you don’t like the price/capability of the camera, wait a year for the next model’. Who would dispute the blindingly fast pace of consumer digital imaging advancement over the past ten years. Between the D2X (released Sept ’04) and the D200 (released Nov ’05) there is a 2.2MP difference in image resolution. This is not as great as some D2X owners would like to think and forward thinking stock agencies who previously drew the line at the quality level of the D2X now consider images taken with the D200. Punters may argue that the newer D200 has most of the quality advantages of the D2X in a smaller and less expensive package. The combination of price, build, size and digital image quality, in today’s terms, makes the D200 a good candidate for underwater use. However, there are a few downsides to moving up the quality ladder. The D200’s higher battery consumption means that I am forced to change batteries each dive day rather than every three or so with the D70. For storing and archiving digital negatives there is a less obvious advantage; firstly for the D70 and next for the D200 over the D2X: the Digital Asset Management costs are lower with smaller RAW files. More so because most photographers store multiple versions of images and this does become significant over time.
Compared with the Sealux CD70 housing
The first thing that struck me about the Sealux CD200 housing for the Nikon D200 camera is that it is actually no bigger than the Sealux CD70 housing for the Nikon D70 camera. In fact it is marginally smaller. The specs on paper show a slightly decreased length (the direction that the lens lies) down from 131mm to 129mm. Fitting a slightly larger and heavier camera into a marginally smaller housing is an interesting approach. The Nikon D70 is already a snug fit inside the CD70; which, is one of the more compact D70 housings available on the market. The CD200 is heavier both topside and underwater. My freshwater testing with a 60mm Nikkor lens and the Sealux PN94 flat port on both cameras in respective housings produced the following results. The CD200 weighed 0.43Kg underwater while the CD70 housing was neutral. Topside the CD200 weighed in at 4.75Kg with camera, the 60mm lens and flat port.
|
CD70 for Nikon D70 |
CD200 for Nikon D200 |
|
|
|
|
The Numbers |
||
|
|
CD70 for Nikon D70 |
CD200 for Nikon D200 |
|
Published dimensions in mm |
L: 131, W: 176, H: 158 |
L: 129, W: 176, H: 158 |
|
Published dimensions in inches |
L: 5.16", W: 6.93", H: 6.22" |
L: 5.08", W: 6.93", H: 6.22" |
|
Published housing weight empty |
1.95 Kg (4.3lbs) |
1.99 Kg (4.4lbs) |
|
Topside weight incl. camera PN94 port & 60mm Nikkor lens |
4.5 Kg (9.9lbs) |
4.75 Kg (10.47lbs) |
|
Freshwater weight incl. camera PN94 port & 60mm Nikkor lens |
Neutral |
0.43Kg (0.95lbs) |
|
Approx. topside weight with 2 housed SB800 strobes, arms, 180F dome port and 12-24mm lens. |
9.5Kg (20.94lbs) |
9.75Kg (21.5lbs) |
|
|
|
|
|
Published Test depth |
90 m (295 ft) |
90 m (295 ft) |
|
Sealux housing guaranty |
2years |
2years |
The housing in detail
i) 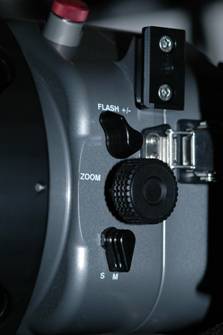 ii)
ii) 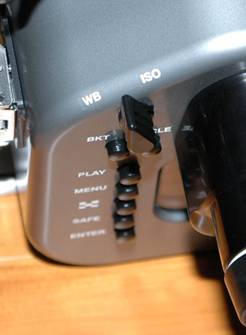
i) A lever is provided for the flash mode button (for rear curtain synch) and another lever for the Single servo and Manual focus settings; however, this lever does not have sufficient range to rotate to the Continuous servo setting.
ii) A single control lever for WB and ISO is provided but the third of the trio, to access the QUALITY button is missing.
Challenging controls
Features of the housing which I think would be a challenge for a manufacturer to build are as follows.
-
· A control for the flash mode +/- button: a lever for this obscurely placed button has been provided and placed in an accessible position allowing setting for rear curtain flash synch when required.
-
· The ability to remove the storage card and access to the USB socket without needing to remove the camera from the tray: the D200 storage card door opens to the side of the camera whereas the D70’s opens to the back of the camera; this may be an issue for housings seated well into the case. On the CD200 the camera back extends well out of the main case when held on the tray so both the storage card and the USB socket are easily accessible while the camera remains fixed.
-
· Controls for the ISO and WB: a single control for ISO and White Balance is provided by a toggle button but the third, of the trio, the QUALITY button is not accessible. The ability to change image quality underwater is arguably unimportant.
-
· A control to switch between single, continuous-low, continuous-high (motor-drive) speed shooting. This would require two actions, one to depress a small release button while the other rotates the mode dial. I do not expect any manufacturer to provide this feature.
The CD200 housing boasts some tried and tested design features such as:
-
· a raised inner lip on the housing body which prevents water droplets from contaminating the housing interior once the lid is removed;
-
· three possible mount locations for strobes, one on each handle and one on the left side of the casing;
-
· a sacrificial zinc anode on the casing strobe mount (I have noticed on my D70 housing how useful this is as the casing looks like new yet noticeable corrosion is evident on the anode after 1.5 years);
-
· a large 126mm diameter lens port opening with good bayonet fitting system. The tubular flat ports have an outside diameter of 135mm (the glass on the 180F fisheye dome port has an outside diameter of 180mm);
-
· an (optional) audible moisture alarm;
-
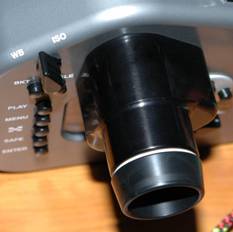
the magnified prism Grand Viewfinder (optional).
Absent from the CD200 housing are:
· no control for the Function button (Ikelite appear to be the only manufacturer to-date offering this control);
· no control for the QUAL button, one of the ISO, WB and QUAL trio;
· no control for the AF-ON button;
· no mode dial to switch between single, continuous-low, continuous-high speed shooting;
· no Continuous servo AF (AF-C) focus mode control which allows the camera to focus continuously while the shutter release button is half pressed for release priority shooting. The Single servo and Manual Focus settings are accessible through a single lever but the control does not have sufficient range to rotate to Continuous servo setting.
My initial feeling is that the two controls which I may miss are the Continuous server AF control and the Function button. The Function button is the lower of the two unlabelled buttons on the front of the camera and is user assignable; default is Flash Value lock. While I do not consider the Function button to be a show stopper, access to the AF-C lever may be a significant omission.
Highlights in brief
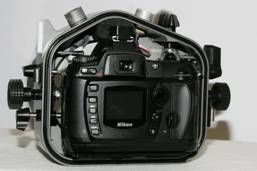
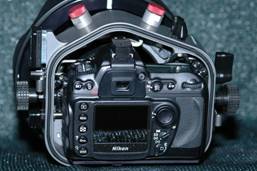
· The grand viewfinder provides excellent coverage and is a pleasure to use underwater. I believe that this component is also produced by Sealux for SUBAL housings.
· The housing is durable and compact with the camera fitting snugly; this is not a ‘one box fits all’ housing.
· The housing's Teflon coated anodised, milled aluminium offers good scratch resistant protection on the outside, looks good and stays looking good if correctly maintained.
· Controls have a positive feel and are easy to use with gloved hands.
· While the handgrips first appear to be flimsier than those on Nexus housings, they do feel to be in the right position for shutter release and control. They do tend to flex a little when strobes are extended.
· It is possible to remove the camera's memory card without needing to unscrew and remove the camera from the housing tray.
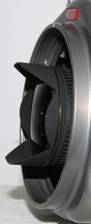
· It is also possible to switch lenses from the front of the housing through the port opening while the camera remains mounted in the housing. For lenses with zoom gears, using a lens removal tool may be used to access the camera’s lens release button.
· Sealux’s hollow tubular strobe arms increase buoyancy and reduce dry weight. The longer arms are slightly positive in fresh water. The arm clamps are well designed and have a good bite on the standard 25mm balls. The T piece screw clamps allow fast removal of the complete arms from the housing and also easily secure these without any noticeable play. The 25mm balls can also accommodate the arms of other manufacturers such as Ultralite or Ikelite. I use these interchangeably.
· Three mounts are provided for attaching strobe arms, one on the left side of the housing and two on the housing handles.
· Lens port construction is a combination of optical glass bonded to a durable, high strength machined delrin plastic barrel utilising a bayonet style fitting with an O’ring seal on the port barrel and are easily installed.
· The 18-70mm Nikkor lens can be accommodated in either a DOM106 dome port, with a #2 close up diopter, or in the PN94 flat port.
· The same 180F dome port may be used for the 10.5mm fisheye and Sigma 15mm fisheye lenses. This port may also be used with the Nikkor 12-24mm DX lens by adding a 28mm extension ring. A lens gear is required for the Nikkor 12-24mm lens to allow the zoom to function using the zoom / manual focus wheel.
|
The grand viewfinder provides excellent coverage and is a pleasure to use underwater
|
|
Lenses can be changed from the front of the housing through the lens port opening while the camera remains mounted
|
Documentation and materials provided
· Basic installation instructions were supplied in English and were easy to follow.
· No silicone grease was supplied for the o’rings; neither is any indication given for any specific type of silicone grease. On the CD70 I have used silicone grease from the Olympus P&S housings. This appears to be well tolerated by the o’rings (no leaks yet – touch wood).
· A pump bottle of lubricant for cleaning the housing is supplied.
Observations in setting up
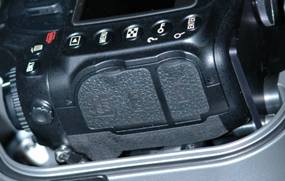
· Once correctly aligned the camera fits snugly on its supports and is held in place on a base plate with a single tripod mount screw. Sealux recommends removing the storage card until the camera is correctly mounted on the base plate.
· It is important to ensure that the camera is powered on and that the housing power switch lever is also correctly aligned by placing in the on position before inserting the camera into the main housing case for mounting. It is also important to ensure that the Auto Focus Area Mode selector is correctly aligned, that the focus mode selector and main command dial controls are pulled out and that the lever for +- and mode buttons are neutral.
· The flash foot cable is inserted into the camera hot shoe after switching off the power once the camera has been secured in the tray by tightening the mounting screw.
· The moisture alarm can be easily tested by applying a moistened finger to the exposed contacts prior to installing the camera.
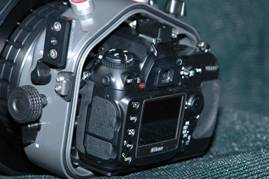
The camera fits snugly on its supports
Observations in Use
· The grand viewfinder is exceptional and a pleasure to use.
· Shutter trigger lever – good positive tensile feel with sufficient feedback on the half press to activate autofocus and metering.
· The AE / AF Lock lever opposes the direction of the shutter lever and it is easy to control both with finger and thumb while holding the handgrip.
· Lens zoom gear works well on the 12-24mm lens with DOM180F port; this lens can still be removed from the front of the housing by removing the port if a lens removal tool is used. I use a small Allen key covered with plastic tubing as a lens removal tool.
· The handgrips are well located giving good balance and leverage for aperture, shutter trigger and zoom controls.
· Aperture and shutter speed dials work well with good tensile feel in the water.
· As mentioned above, removing the memory card and inserting the USB cable can both be done while the camera remains mounted in the front half of the housing.
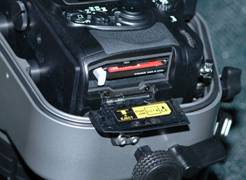
The memory card and USB port can be accessed without removing the camera
Build Quality Observations
· Durability - good
· Design points - good
· Gears and levers - good (shafts have double o'rings)
· Materials - good (teflon coated anodised, milled aluminium for housing, optical glass bonded to delrin plastic for ports)
· Functionality - good
· Look and feel – good
· Internals such as o’rings and hexagon screws are of standard size and thus easily replaced if required.
Initial assembly
The only issues experienced during first time setup were a malfunctioning strobe caused by a stiff strobe foot not engaging far enough into the camera hotshoe. This was resolved after troubleshooting. A minor adjustment was required to the wheel on the main control dial as it was not engaging. A small Allen key was required to extend the wheel closer to the command dial.
Lighting
I have chosen to use Nikon SB800 speedlights; both single and dual. With the Nikon D200 this had the unexpected advantage when using auto FP high speed synchronization to unreservedly go beyond the camera's top sync shutter speed of 250s. On the housing I also chose to have an optional second strobe port installed. The first port socket was wired for a Subtronic fixed pin plug which Sealux uses on their SB800 housing cable. The second port used a Nikonos style port with all five pins active. This port has been successfully used for both the Fantasea SB800 housings in iTTL and the Inon optical converter to optically fire dual D180 strobes.
The SB800 Speedlight Housings
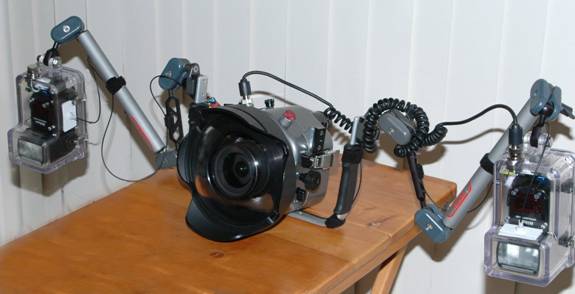
CD200,180F dome port, Sealux strobe arms, Fantasea housings for Nikon SB800 Speedlights
· The SB800 Speedlight works well underwater both in iTTL and manual modes.
· I have tested two brands of housings for the SB800s, the Sealux CX800 and the Fantasea FSB-800. Both have pros and cons.
· Sealux produce a milled aluminium housing which can optionally incorporate an LED focus lamp which is independently powered from an internal NiMh battery pack (charger is supplied with this option). The housing is very robust and comes standard with Subtronic cables with stainless spiral protectors at each end (why can’t other manufacturers follow suite?). The zoom head adjustment buttons are not available on the Sealux strobe housing, neither is the centre setup button.
· Fantasea produce a clear polycarbonate strobe housing for the Nikon SB800 Speedlight. All controls are accessible in this housing although it lacks the optional built-in LED focus lamp. The finish of the Fantasea FSB-800 housing does not quite match the costlier Sealux CX800. Because of the clear case, two Fantasea housings can be used by electrically cabling one to the housing strobe port and optically controlling the other using a fiber optic cable to transmit the light signal through water. To use both strobes, the SB800s must be set to master / remote with control being done from the master. In this way both of the SB800s can be controlled from the one designated as master to fire at different levels in different modes from iTTL to varying manual settings. For more information on how this can be done, please see: http://www.underwaterdisplay.net/SB800_Dual/index.htm
Other strobes
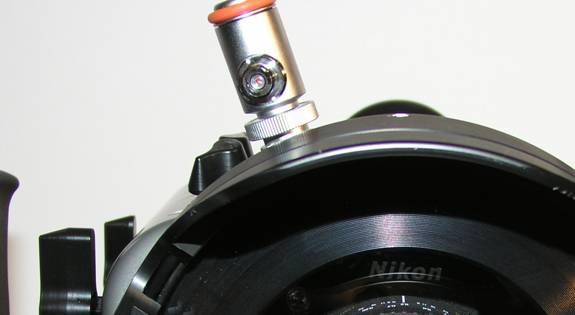
The Inon optical converter used in a Nikon style strobe port to optically fire strobes
· Inon’s optical converter which connects to a Nikonos style port can be used to control optical strobes such as the Inon DS180. Tests were done using two Inon D180 strobes. All five pins were wired rather than just having two pins active. Using this wiring circuit may however cause other cabled strobes to malfunction such as the Ikelite DS-50 substrobe.
Technical support
Phone support when required was good and provided in spoken English. Jurgen at Sealux has been helpful when contacted.
Compared with other housings
A functional comparison with D200 housings from other manufacturers is beyond the scope of this review suffice to say that I would consider compactness, the availability of good ports and a good viewfinder to be of high importance in my choice. Optical glass is a factor for me. Cost wise I found the Sealux CD200 to be less expensive than other milled aluminium / optical glass offerings.
Conclusion
I am pleased with the CD200 and can see myself getting years of use from this professional level housing. No offering is entirely perfect; affordable, functionally complete, ergonomically flawless, compact, durable, of a high quality build and which minimizes the risk of leakage by simplifying camera set up. Purchasing from a German manufacturer when living on the other side of the world in New Zealand may be considered risky come time for support. When I have needed support however, Sealux have been helpful and have taken my relative remoteness into consideration in resolving issues. On one occasion, rather than insisting on returning the housing to them for adjustment at my request they shipped the part with installation instructions. With further use I will no doubt learn more of the flaws and grow to appreciate the good features. I would recommend this housing.
